Comply with this tried and examined methodology and detailed step-by-step tutorial to learn to refinish wooden furnishings, together with intricate particulars, with out sanding, from an skilled.
As you might be refinishing wooden furnishings, make sure you additionally learn our suggestions for portray furnishings with totally different paint sorts, the right way to stop tannin (knot) bleedthrough, and the right way to stain wooden any colour.

Easy methods to Refinish Wooden Furnishings (With out A Lot of Sanding)
by Beck from Beckwith’s Treasures
This put up comprises affiliate hyperlinks to your comfort. Study extra and skim our full disclosure coverage right here.
So you could have a chunk of furnishings you like, nevertheless it’s needing some consideration. Right here’s my course of, begin to end primarily based off years of expertise, that will help you refinish it proper!
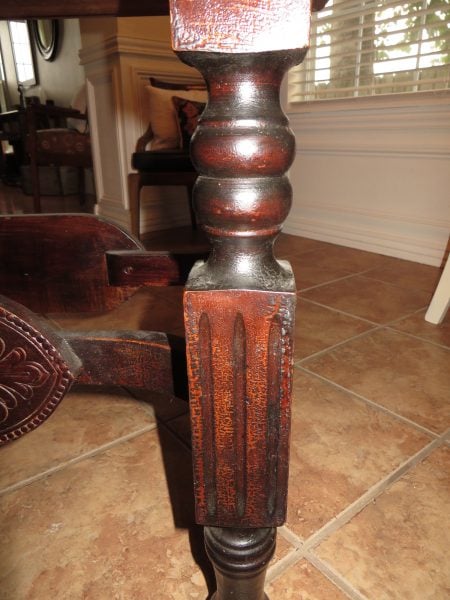
This wonderful vintage eating desk was actually caked with previous, crackled varnish so it’s the good piece to share!
Sooner or later somebody had stripped the highest and the inserts, however not the bottom.

Stripping the previous end off intricate items like this ornate base would possibly seem to be a frightening job…

And the thick, bubbly previous end appears to be like so everlasting, however you are able to do this! I’ll present you the way!
Don’t miss these different inspiring refinished furnishings initiatives: Kitchen desk refinished for a brand new look – Refinished Drop Leaf Desk – Espresso Desk Refinished to Buffet Desk
First, select the ultimate end.
The very first thing it’s a must to determine when “rehabbing” any piece of furnishings is: how can the piece be “enhanced?”
I’m at first a die onerous “wooden lover.” Older items which can be constructed of wooden we simply don’t see a lot any extra in new, inexpensive furnishings…walnut, cherry, mahogany, teak, rosewood deserve to point out off their picket magnificence.
Nonetheless, I’ve additionally painted many, many items. Right here’s how I determine to color or refinish furnishings:
I paint the piece if:
- it has lots of water injury
- it has damaged or “bubbled” veneer that wants restore
- it’s lacking trim items which have to get replaced
- it’s simply an “outdated” piece with little worth and a POW of colour is what you’re after
- I would like uniform-looking furnishings
Need to paint? We’ve obtained you lined: Easy methods to Paint Furnishings, 4 Half Collection with Evaluations
I refinish the piece if:
- it’s largely free of injury, or has solely injury that may be corrected
- it’s absolutely intact with no lacking items
- I just like the look of wooden grain and its inherent colour variations
TIP: If you happen to refinish a desk with inserts, be sure to strip, stain and end these on the similar time so they are going to match!
Subsequent, Strip Off the End
Even when you will paint, I counsel stripping off the present end or paint in your piece of wooden furnishings.
In my expertise, you’ll get a far superior end result for those who first strip the piece down to reveal wooden. My tried and true methodology doesn’t require a lot sanding both!
Bonus: you’ll be able to choose up all of the merchandise you want at any residence enchancment retailer!
 Merchandise you will have to strip and refinish wooden furnishings:
- Citristrip (1/2 gallon, $20)
- An affordable “chip” brush ($1.50)
- Flat, plastic scraper (lower than $2)
- Acetone (Crown, 1 gallon, $17)
- Lacquer Thinner (Crown, 1 gallon, $18)
- 0000 Metal Wool ($4)
- Mineral Spirits ($8)
- An previous toothbrush (by no means toss an previous toothbrush)
- Protecting Gloves ($5)
- Metallic/glass bowl (For straightforward mixing, I purchase the massive 8 cup measuring cups at thrift shops and storage gross sales!)
- Outdated towels/store rags
- Something disposable to guard your work floor (plastic drop material, previous newspapers, flattened cardboard)
- New end of your selection (Paint, stain and oil, clear coat, and so forth.) and the instruments to use it
Easy methods to Refinish Wooden Furnishings, Die-Onerous Guidelines
No matter “fashion” or “interval” of the piece, I’ve just a few “die onerous” guidelines for stripping and refinishing ANY wooden furnishings. All of us need your undertaking to prove wonderful, so please keep in mind:
#1: When stripping previous finishes, there are NO shortcuts.
Painted or stained or lacquered or a number of finishes, there are zero shortcuts! If you happen to don’t do it proper, your new end will seem like crud and you’ll have wasted your time. Settle in and do it proper!
#2: All the time WEAR GLOVES, EYE PROTECTION, LONG PANTS AND CLOSED TOED SHOES.
You’re working with chemical compounds! Belief me…splash these things in your pores and skin and it’ll go away a mark! (I put on glasses so I purchased an affordable pair of glasses to put on whereas I work!) Don’t fiddle, be secure!
#3: Defend your work floor.
Don’t do that on any grass you might be keen on and at all times put one thing disposable (paper, cardboard, plastic, no matter) beneath the piece to catch all of the drips and gunk!
#4: All the time observe every product’s security directions for indoor/out of doors use, recent air necessities, and so forth.
Now, let’s get to work!
Easy methods to Refinish Furnishings, Step by Step
Step 1: Take away heavy end with Citristrip
If the prevailing end (whether or not varnish, shellac, poly or paint) is admittedly “heavy” I first coat it with Citristrip.
(If the piece doesn’t have an actual heavy present end or a number of layers of paint, chances are you’ll not even wish to use Citristrip…use your judgment! Skip to Step 2 and use simply the acetone and lacquer thinner combination.)
To use the Citristrip, I take advantage of an affordable “chip” brush to use it per the instructions.
After letting that sit a bit, I scrape all of the flat elements with a plastic scraper. ALWAYS scrape with the grain.

(For the right way to “scrape” all of the turned legs and carvings…see step 2 under)
Typically the end melts proper off, different occasions it’s fairly cussed…simply coat it once more with the stripper, let it sit a bit, after which scrape it once more! It might take 2-3 functions to get all of the “heavy” end off.

Step 2: Scrub with metal wool, acetone and lacquer thinner combination
After eradicating the actually heavy previous end or nearly all of the paint, combine 1/2 acetone and 1/2 lacquer thinner in a glass or steel bowl.
Utilizing 0000 metal wool, scrub the piece with this combination. That is one of the simplest ways to get the previous end and gel stripper off turned legs and etchings.
With the 0000 metal, I can scrub the piece with out worrying an excessive amount of about damaging the wooden!
It will take away the stripper you couldn’t scrape off and soften the varnish proper off the turns and carvings. Work from the highest down and don’t be afraid to make use of this combination liberally!
One distinctive device for eradicating previous end….toothbrushes. Use an previous toothbrush to get into all of the corners, grooves and crannies…simply dip it within the acetone/thinner combination and scrub away!
They’re robust sufficient to clean out the crud however received’t harm the wooden!
Have you ever ever seen a chunk of furnishings that has been refinished and all of the corners and joints are darkish? That’s as a result of they didn’t get all of the previous end off…use a toothbrush and also you received’t have that drawback!
This course of will in all probability take a while and elbow grease. I often combine a number of batches of the acetone/thinner and undergo a number of items of metal wool.
I in all probability went round this desk 4-5 occasions simply scrubbing with the combination! (That is the place a type of low store stools on wheels is a again saver!)

If you happen to don’t take this course of critically and take away of ALL the previous end, you might be losing your time since you WILL be disillusioned.
Whereas this stripping course of could appear labor intensive, it’s a lot simpler than sanding the previous end off and you might be a lot much less more likely to injury the piece.
Which brings me to Step 3…..
Step 3: Sand as little as attainable
It’s best to nearly at all times use chemical strippers in case your objective is to take away all of the previous end or paint and solely sand a tad (with the grain…if wanted…220 grit) AFTER you could have stripped all of the previous end.
Many elderly items (in contrast to this desk) could have veneer. Veneer may be skinny and for those who sand too vigorously you are able to do lots of injury!
You’ll NEVER get all of the previous end out of ornamental carvings or turned legs (like this desk) with sandpaper…not taking place!
Additionally, palm sanders have a tendency to depart little “swirly” marks. As faint as they might appear, they will be obtrusive for those who apply stain.
Save your self the grief…hand sand with 220 grit paper on the flat surfaces and metal wool on the ornate areas.
SAND WITH THE GRAIN!! Cross grain marks WILL present up for those who stain the piece!

Step 4: Examine your wooden furnishings piece
When you strip all of the previous end, you might be REALLY going to see the “character” (grain) of the wooden.
Loads of previous finishes had been utilized with a “multi-layer” course of or had been sprayed on with the stain blended in with the end. This course of was used to offer the piece a extra “uniform” look and conceal the “variations” within the wooden grain.
If you happen to like a extra uniform look than your furnishings piece now exhibits or for those who discovered some surprises as you had been working, there isn’t any disgrace in deciding to color it!
Additionally, for those who discover that your piece now wants some repairs, such because the stripping course of dissolve adhesives (glue) that was used on joints, that’s not an enormous concern.
It’s best to strip and stain the piece BEFORE you do any main repairs. Stain is not going to penetrate glue…so for those who get any glue on the wooden, it received’t soak up a stain and shall be seen without end!
So, rule of thumb: If you will paint a chunk, restore it BEFORE paint…if you will stain, restore it AFTER stain

It took me 4 hours to fully strip all of the previous end off this desk!
Step 5: Clear up with mineral spirits
After you could have stripped all of the previous end, wash the whole piece with clear rags and mineral spirits.
Storage gross sales and thrift shops are nice locations to search out previous towels. Minimize them up into washcloth-size items.
Which jogs my memory…WORD OF WARNING!!!! DO NOT THROW RAGS OR STEEL WOOL IN A TRASH CAN IF THEY HAVE ANY CHEMICALS ON THEM. THEY TRULY CAN SPONTANEOUSLY COMBUST AND BURN YOUR HOUSE DOWN!!!!
- Lay them out to dry within the solar.
- Bag them up after they’re fully dry and have aired out for just a few days!!
- Don’t bag them with paper or cardboard and preserve them separate from family trash!
Whereas washing your piece down with the mineral spirits chances are you’ll discover just a few spots that want somewhat extra “scrubbing” to take away any previous end…not an issue…simply scrub it once more with metal wool or a toothbrush and the acetone/thinner combination after which wash it down with the mineral spirits.
Let the piece dry after which give it a light-weight sanding, if wanted. (Once more, ALWAYS with the grain!) Totally clear off any mud from sanding.

Step 6: Apply your new end
As talked about earlier, there are numerous choices right here! If you happen to love the colour of the wooden when it’s moist with mineral spirits, apply a transparent coat end.
If you will paint, observe the producer’s instructions. My favourite end is stain.
Discover the paint you want: 5 Totally different Forms of Paint for Refinishing Furnishings
Suggestions for utilizing stain to refinish wooden furnishings:
Don’t use stain that has a “end” or “sealer” in it.
If you happen to don’t like the colour, you might be just about caught. Use a stain that requires a separate end. That means, for those who aren’t actual eager on the colour, you’ll be able to instantly wipe it off with mineral spirits and even layer one other stain colour on prime of it. Make changes to the colour till you might be pleased with it.
Take into account, totally different woods will stain otherwise.
Your greatest wager is to stain a small “check” patch on the piece and have mineral spirits and a clear rag useful to wipe it off for those who don’t like the colour.
My favourite furnishings end…
After the stain dries, I personally desire a tung oil end. Tremendous straightforward to wipe on…just about “fool proof.”
I apply 3-4 coats and sand with 0000 metal wool and wipe with tack material between coats!
The superior factor a couple of tung oil end is it’s tremendous straightforward to “repair” scratches and put on…simply evenly “sand” it with 0000 metal wool, wipe with a tack material and apply one other coat of the end!
Right here I talk about the (lack of) distinction between oils. I often “re-oil” the tops of my tables annually…or as wanted.
I NEVER apply poly to stained finishes! I’ve an previous walnut dresser I sealed with poly and I remorse it! Sometime it would get (re)refinished correctly!
My Refinished Vintage Desk
I stained the highest of this desk with a brown walnut stain.

And I made a decision to make use of a glaze tinted with black paint on the bottom. I like the truth that the glaze permits the wooden grain to point out by!
After the glaze dried I sealed it with 3 coats of tung oil end. My authentic plan was to color the bottom white and I can nonetheless do this in some unspecified time in the future if I select.

For now I’m going to depart it because it and simply take pleasure in the great thing about the wooden. That is a type of items that begs for “much less is extra!”
Get pleasure from a comparability of earlier than and after photographs:


——————————–
Beck, thanks a lot for sharing your know-how with us!
Remodelaholics, head over to Beckwith’s Treasures with all of your questions on refinishing furnishings — and make sure you try her different initiatives, too, like this upcycled grandfather clock and the right way to beef up your door trim.
Extra Furnishings Refinishing Concepts from Remodelaholic:
You can even observe alongside on social media: Fb | Instagram | Pinterest | Youtube
Please Pin this!

Initially printed 12.27.2014 // Up to date 03.24.2021